Javascript for Designers 101: The DOM (An Illustrated Guide)
Learn all about the mythical DOM: What the heck it is, and why it is so important when you are getting started in your Javascript journey as a designer.
Find out moreIf you ever tried to learn Javascript on your own and lurked around a developers’ community (i.e. Stack Overflow), chances are you’ve heard of “the DOM.”
But do you know exactly what it is? And more importantly, WHY it’s so damn important when learning Javascript as a designer?
Well, that’s exactly what we’ll be covering in this post. You’ll finally understand what the heck your smug developer friend is talking about next time he decides to throw a casual “DOM” around at your next meeting.
Sound good? Read on…
Enter “the DOM”
Javascript developers love to throw this term around because it makes them feel smart.
OK, not really. But it’s really helpful when trying to explain how to do something in Javascript.
Well, what the heck is the DOM anyways? Well, first of all, DOM stands for Document Object Model.
OK, great. But what does that all mean really?
The DOM is the code that gets compiled by the browser from all your HTML, CSS, and Javascript files and outputted to the screen. Developers usually refer this as the browser “painting” a picture on screen.
Let’s break that down a bit though…
Picture a tree with lots of branches going upwards to the sky. Well, the DOM is a lot like that. In fact, you could say that the DOM is in fact, a virtual tree that’s created from all your source code.
A real code example
Let’s say I had a simple HTML file that looks like this:
<html>
<head>
<title>My awesome page title</title>
<meta name="description" content="An introduction to the DOM">
<script src="js/my-javascript-file.js"></script>
</head>
<body>
<div>
<h1>Page title</h1>
</div>
<div>
<div>
<p>Some paragraph.</p>
<p>Another paragraph.</p>
<img src="images/some-image.jpg" />
</div>
<ul>
<li>A list item</li>
<li>A list item</li>
<li>A list item</li>
</ul>
</div>
</body>
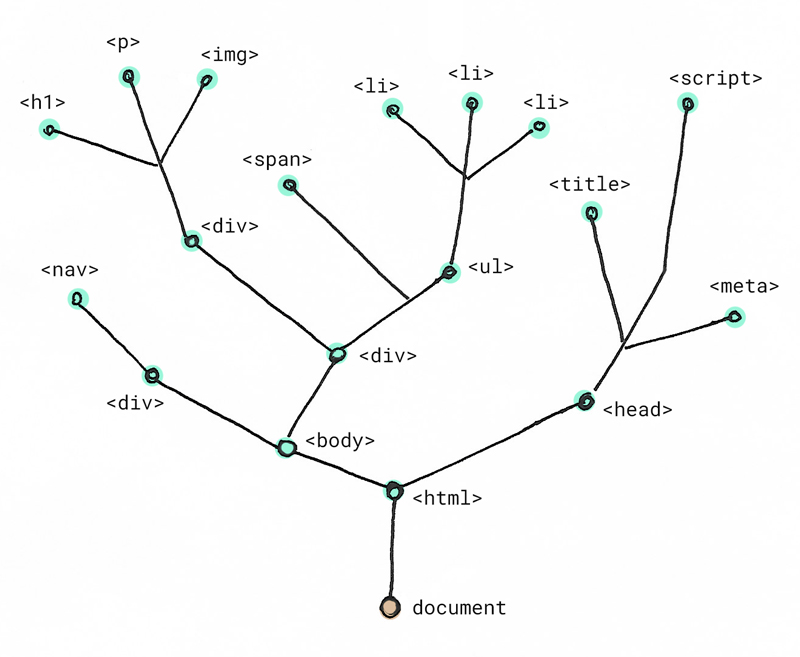
</html>Here is what this would look like once the browser runs this block of code and creates a little DOM tree for us:
As you can see, your tree has a bunch of different branches that each extend as children of other branches. And at the end of each branch is an html tag (e.g. div, p, li, etc). We could say these make up the leaves of our little tree.
Now, of course, these trees can get pretty massive. Just imagine a massive web app or complicated website (e.g. Facebook).
However, no matter how big or small your DOM tree, they all start out the same: The document is the root and it’s where all your HTML tags start branching out from. We’ll talk a bit more about this mysterious document root on another post, but just understand for now that every DOM tree starts with this as the base and then uses all your html tags to create the branches and leaves of your DOM tree.
One important point: The DOM is NOT just your .html file!
I struggled wrapping my mind around this concept when I first started learning Javascript.
For the longest time, I used to confuse the DOM with my actual source code (the code you write in an HTML file for example).
However, the DOM is not exactly just the HTML code you write.
Here’s an example to help you understand things better. Let’s pretend I have an HTML file with p tag in the body and nothing else. This paragraph has a class called ‘blue.’
<p class="blue">You are learning Javascript!</p>Now, inside my CSS file, I have a class called blue that will show the paragraph in blue.
No biggie, right?
HOWEVER, I also have a CSS style for a paragraph that contains both the class blue and active. This style will not only turn the paragraph blue, but it will also underline it.
Now, I’m going to use a tiny bit of Javascript to add a CSS class to our paragraph (don’t freak out, we’ll be talking in detail about the basics of what’s happening here in another lesson).
Let’s use a live pen demo so you can see how this works:
See the Pen Javascript 101: DOM Example by John Ludena (@johnludena) on CodePen.
If you’ve never used CodePen before, it’s a super cool web app to play around with code online quickly without having to necessarily create a local project on your computer. And most “Pens” are just three simple files: an HTML file, a CSS file, and a Javascript file.
But wait, what exactly is going on in the Javascript file?
Just take my word for it for the time being, but those two lines ADD a CSS class called ‘active’ to our existing paragraph with a class ‘blue’. In other words, the “picture” that the browser will finally end up “painting on screen” once the page loads will now have TWO classes: blue and active

Looking at the DOM using Google Chrome's developer tools
Got it? Your own HTML code alone is NOT the DOM. The DOM is the final HTML picture your browser paints once ALL your files (yes, your Javascript files as well) are read and compiled.
Conclusion
I hope that now you finally understand a little more about the basics of creating all interactivity in Javascript by first understanding what the DOM is and how it is created.
If you want some more where that came from, make sure to sign up for my upcoming FREE Javascript for Designers crash course below.